DipsyTheTeletubb (talk | contribs) No edit summary Tag: Visual edit |
DipsyTheTeletubb (talk | contribs) No edit summary Tag: Visual edit |
||
| Line 185: | Line 185: | ||
|- |
|- |
||
| <span style="color:#AA0000">'''Vampire'''</span> |
| <span style="color:#AA0000">'''Vampire'''</span> |
||
| − | | +1500 Health |
+ | | +1500 Health |
| + | +2/3s Mana Steal |
||
| + | |||
| + | +250/3s Life Steal |
||
| +1500 Health |
| +1500 Health |
||
+400/3s Life Steal |
+400/3s Life Steal |
||
Revision as of 00:10, 12 November 2021
| Nest of the Grootslangs | |

| |
| Discovery Lore | |
|---|---|
| Just beyond this now abandoned ruin lies a dug out nest crawling with infantile Grootslangs. If left to mature, these newborn creatures will grow powerful enough to decimate the swamp. | |
| Access | |
| Coordinates | X: -1976, Z: -5610 |
| Minimum Level | 54 |
| Suggested Level | 60-80 |
| Max Party Level | 320 |
| Quest Required | Realm of Light I - The Worm Holes |
| Runes Required | 2 Az Runes |
| Players Required | 3-4 |
| Raid | |
| Monsters | Twisting Parasite Invasive Tarantula Urging Dragonfly Crawling Arachnid Venomous Millipede Poisonous Centipede Lost Lizardman Toxic Slime Lost Lizardman Lost Naga Encroaching Tunneler Slime Chomper Carnivorous Gunk Invasive Tarantula (Miniboss) Primeval Bat Floral Expectorators |
| Boss | The Grootslang Wyrmlings Grootslang Hatchling |
| Rewards | 160000 Experience Points Additional rewards may include: |
Nest of the Grootslangs, subtitled "A hunger to devour the land...", is the first and currently lowest-level Raid in Wynncraft, located in the Olux Swamp. It was added to the game in the 1.20 Gavel Reborn update, alongside the two other high-level Raids in Gavel Province, Orphion's Nexus of Light and The Canyon Colossus.
Like other Raids, Nest of the Grootslangs is a team-based challenge, requiring a party of 3 to 4 players to complete. As it is designed for mid-level players from level 60 to 80, the total combat level of all party members is capped at 320. It is an introductory Raid unlocked after completing The Worm Holes, the first part of the Realm of Light questline, and introduces various new mechanics, including a variety of challenges, powerups, and unique Raid rewards such as Mastery Tomes, Charms and Amplifiers.
Preparing for the Raid
| Location |
| Olux Swamp -1976, -5610 |
| Wynncraft Map |
To take on the Nest of the Grootslangs, you must first assemble a party of 3-4 players. Each must be at least level 54, and must have unlocked the Raid by completing The Worm Holes quest. Otherwise, one of the most important considerations when assembling your party is your combined total combat level, which cannot exceed 320. Therefore, raiding with a group of 2 other Lv 100+ people can be done, 2 levels below the level limit, however, if there is a 4th person who would want to join, then a person would have to get a lower-level class to do so.
The entrance to the Raid is inside the ruined temple in the mountains on the northwestern edge of Olux Swamp. The nearest town is Olux, not too far away, which you can use to restock on Runes before or in between runs, as well as Potions, crafted consumables or other supplies, which can prove invaluable.
Once your party is prepared, travel to the entrance, and the party leader will have to hand 2 Az Runes to the Raid Keeper. Az Runes can be obtained as a reward from The Worm Holes quest, as well as found rarely throughout Olux Swamp and the Dark Forest. Once the Runes have been given, your party will enter the Nest of the Grootslangs and be faced with your first Challenge Room.
Challenge Rooms
Progressing through the Nest of the Grootslangs involves defeating three randomly-selected Challenge Rooms in succession. Each of these rooms involve a variety of cooperative challenges, including puzzles, parkour, and combat, that your party must work together to complete. If you die during a challenge, you will be able to spectate the rest of your party while they continue. When a challenge is completed, all dead players are revived; if too many players die at once, however, and you are consequently unable to complete the challenge, you will fail the Raid and be brought back to the entrance.
After each Challenge Room, you will enter a rest area where you can regroup, access a Blacksmith and choose Power Ups before tackling the next challenge; see the Power Ups section for details.
Room 1
3 Platforms
In this room, there will be 3 separate white circles on the ground. When a player stands on a circle, a pillar will unearth itself. If no one is standing on the pillar, then the pillar will decay and 3 other white circles will emerge after 10 seconds. If a player is standing on the platform, then a timer will start ticking down. There will be mobs that are there to shove the player off the platform, so deal with those while the other players deal with mobs down below. Once the timer has run out of time, the challenge will be completed, and you get to progress to the next room.
| Image | Name | Level | Health | AI Type | Abilities | Elemental Stats | Drops | Location |
|---|---|---|---|---|---|---|---|---|
|
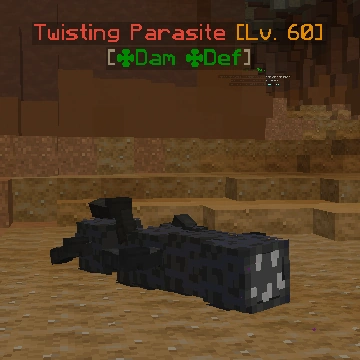
Twisting Parasite | 60 | 7225 | Melee | Charge | ✤ Earth: Damage, Defense | - | Nest of the Grootslangs (3 Platforms Room) |
|
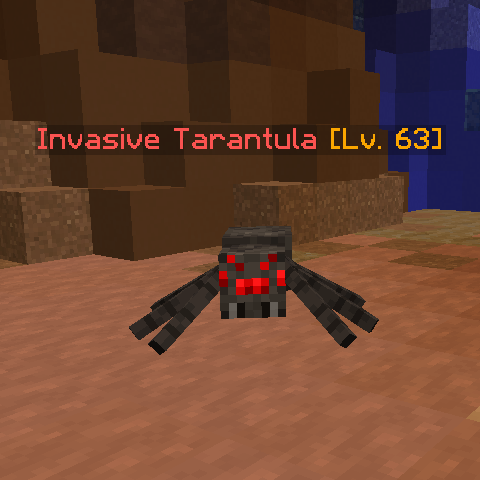
Invasive Tarantula | 63 | 12550 | Ranged | Flamethrower | ✹ Fire: Weakness ✤ Earth: Defense |
- | Nest of the Grootslangs (3 Platforms Room) |
| File:UrgingDragonfly.png | Urging Dragonfly | 62 | 3000 | Ranged | Arrow Storm | ❋ Air: Damage, Defense | - | Nest of the Grootslangs (3 Platforms Room) |
Slimey Platform
In this room, there will be an elevated green disc on the floor, and a player needs to stand on that. A timer will start counting down afterwards. The other players should then defend the player on the platform. After a while, a notification in the chat will appear that an egg is cracking. Kill the Toxic Slime mob to prevent it from hatching. If the egg hatches, it will create an explosion around the egg, insta-killing anyone in the vicinity. Once the timer has expired, the players can continue to the next room.
Room 2
In this room, the group of players must gather 10 Slimey Goo to build a tower to progress to the next room. Completing a challenge will grant you 1 Slimey Goo. After a while, a notification will appear in chat stating that every 20 seconds, a Slimey Goo will Decay from the tower, taking away 1 Slimey Goo from the team's progress. Each room can only have 1 player in it except the Parkour room. There are 2 variations of this room.
Parkour/Battle/Puzzle
| Image | Name | Level | Health | AI Type | Abilities | Elemental Stats | Drops | Location |
|---|---|---|---|---|---|---|---|---|
| File:CrawlingArachnid.png | Crawling Arachnid | 62 | 12500 | Melee | - | ✹ Fire: Weakness ✤ Earth: Damage |
- | Nest of the Grootslangs (Room 2, Variant 1) |
Parkour 1
In this Parkour variant, you must use a cannon to shoot down platforms to get to the end. Once the end has been reached, you will get 1 Slimey Goo.
Battle 1
In this room, there will be a miniboss that you must kill, which is the Poisonous Centipede. Killing the miniboss will grant you 1 Slimey Goo.
| Image | Name | Level | Health | AI Type | Abilities | Elemental Stats | Drops | Location |
|---|---|---|---|---|---|---|---|---|
| File:PoisonousCentipede.png | Poisonous Centipede | 66 | 12500 | Melee | - | ✤ Earth: Damage | Slimey Goo | Nest of the Grootslangs (3 Platforms Room) |
Puzzle 1
In this variant, there will be a pattern on the wall that displays itself for a brief moment. After that, you must kill fairly weak Venomous Millipedes. A Venomous Millipede killed represents a lime-green square on the wall. Get the puzzle right to get the Slimey Goo.
| Image | Name | Level | Health | AI Type | Abilities | Elemental Stats | Drops | Location |
|---|---|---|---|---|---|---|---|---|
| File:VenomousMillipede.png | Venemous Millipede | 62 | 1500 | Neutral Ranged | - | ✹ Fire: Weakness ✤ Earth: Damage, Defense |
- | Nest of the Grootslangs (Puzzle 1 Room) |
Puzzle/Parkour/Battle
Puzzle 2
In this puzzle variant, there will be a lime-green path among a black background on the ceiling. Stay on the lime-green blocks to prevent failing the puzzle. The puzzle changes after you've reached the end, and you get 1 Slimey Goo for reaching the end.
Parkour 2
This Parkour variant is a lot like the one in the Undergrowth Ruins Dungeon, with there being diagonal slime pads that can provide a good bounce. There will also be slime blocks on the walls which are also used to direct you. After you've made it through the first segment, you will then land on Slime blocks and then on Lime Clay. The Parkour will then be normal parkour afterward. Complete the parkour to get 1 Slimey Goo.
Battle 2
In this room, there will be a different miniboss that you must kill, the Encroaching Tunneler. Killing the miniboss will grant you 1 Slimey Goo.
Once 10 Slimey Goo have been added to build the tower, you can progress to the third room.
Room 3
Slimy Goo Room
In this room, there will be a Slimey Goo in front of a tunnel. The player who holds the Slimey Goo will be slower and receive other debuffs. The goal is to get to the end of the room with the player holding the Slimey Goo. There will be various monsters that will attack you and the player holding the goo. At certain intervals, there will be a rock blocking your path. Left-Click on the cracks of the rock to break the rock 20% of the way. After the player holding the goo makes it to the end of the room, the team will then progress with the Raid.
Minibosses Room
In this room, there will be 4 minibosses that must be killed. There will be 2 sections of the room, the top and bottom. Players must defeat the miniboss on the bottom for it to go to the top. When the platform rises to the top, some parkour will be created, and players on the top must defeat the miniboss for the next one to appear on the bottom. Once all 4 minibosses have been defeated on the bottom and top, the team gets to progress to the boss fight.
Power Ups
After each of the three Challenge Rooms, you will be able to choose one of three randomly-selected powerups, increasing in tier from I to III with each successive challenge. Note that each set of powerups to choose from is independently randomized, so being offered a specific Tier II powerup in the second room will not necessarily mean that the corresponding Tier III will be available in the next room.
For further information on the Major IDs provided in some of these powerups, see the Identifications page. Inside the Raid, you can right-click each powerup to see a description of their effects.
| Powerup | Tier I Effects | Tier II Effects | Tier III Effects |
|---|---|---|---|
| Spellcaster | +30 Intelligence +40% Water Damage |
+3/5s Mana Regen +50% Spell Damage |
+40 Intelligence
+85% Water Damage |
| Skill Master | +10 All Skill Points +50% All Element Defenses |
+15 All Skill Points +50% Spell Damage +75% Main Attack Damage |
+25 All Skill Points +100% All Element Defenses +Saviour’s Sacrifice Major ID |
| Berserk | +20% Exploding +50% Main Attack Damage +Explosive Impact Major ID |
+20% Exploding +100% Sprint Regen +200 Main Attack Damage |
+100 Strength +125% Main Attack Damage +400 Main Attack Damage |
| Racer | +30 Agility
+40% Walk Speed |
+40 Agility
+100% Sprint +60% Walk Speed |
+80 Agility
+2000 Health +Freerunner Major ID |
| Vampire | +1500 Health
+2/3s Mana Steal +250/3s Life Steal |
+1500 Health
+400/3s Life Steal +300 Health Regen |
+6/3s Mana Steal
+500 Health Regen +Heart of the Pack Major ID |
The Boss Fight
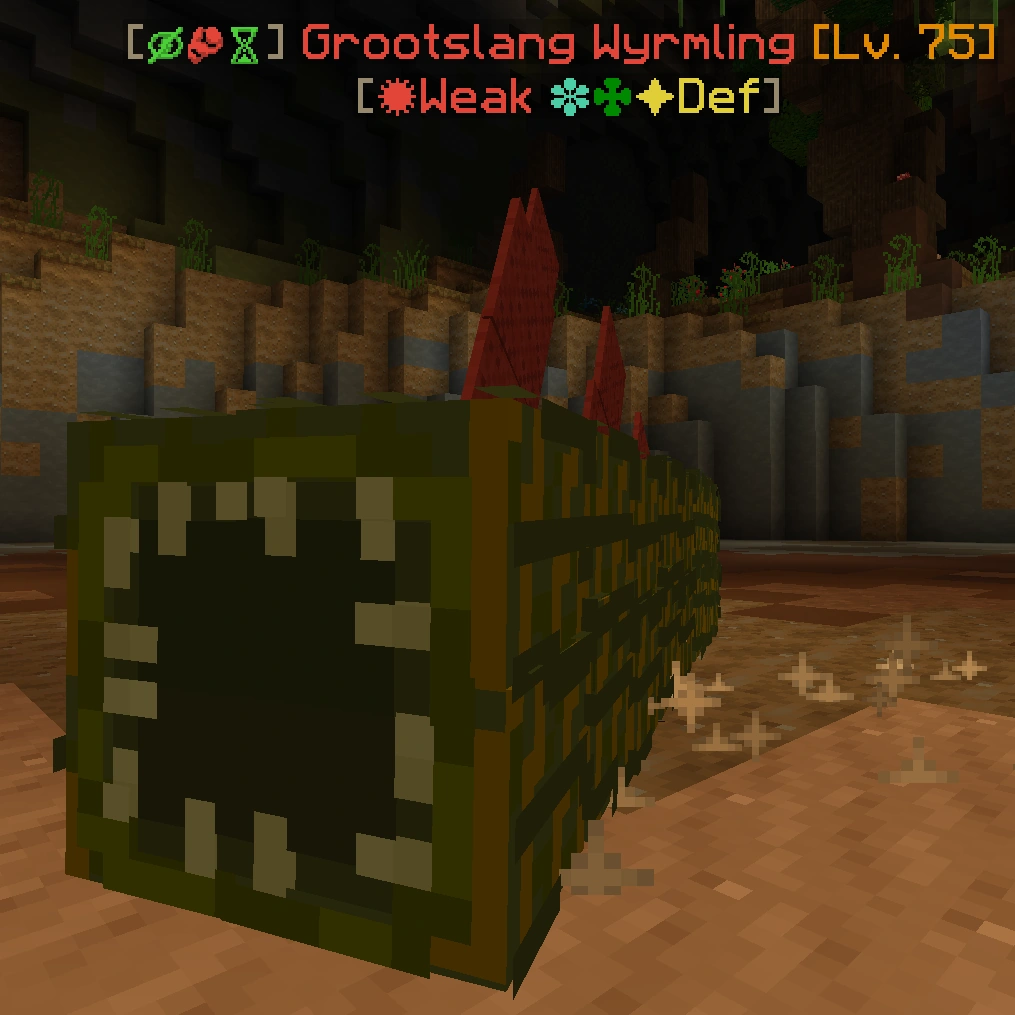
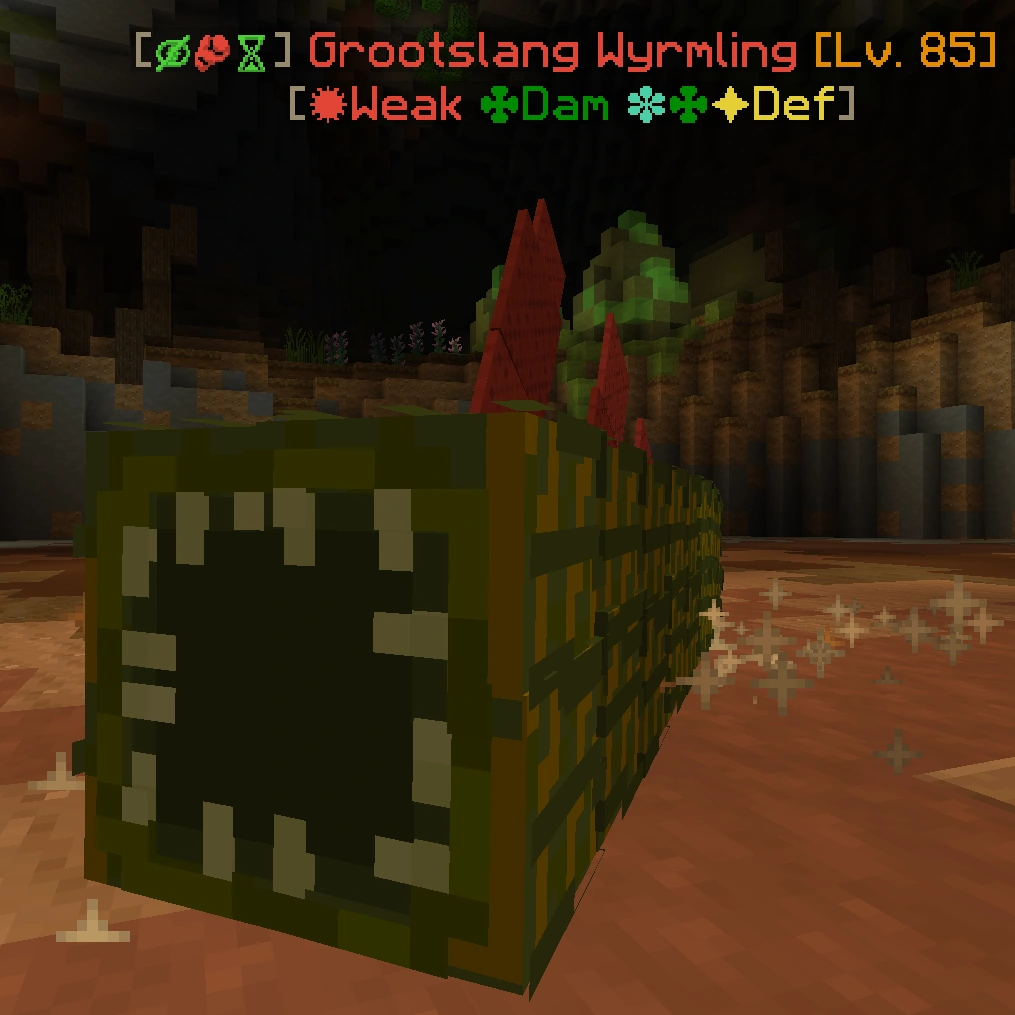
The Grootslang Wyrmlings, subtitled, "The Restless Devourers" are the boss of the Raid. There will be several Grootslang Hatchlings that also plague the area, and other things will also appear to make the fight harder. The Boss fight has 5 phases, and the fight gains new mechanics as it progresses, and the arena will shrink. After the first Grootslang Wyrmling is killed, a swarm of Grootslang Hatchlings will appear as a challenge in between phases. When the second phase is started, Holes will appear in the arena. If you fall in a hole, you will be killed. At the fourth phase, Floral Expectorators will appear after a while. They are ranged mobs which can make the fight more difficult if kept alive. When the fifth and final Grootslang Wyrmling has been killed, the raid is completed.
Phase 1
| Image | Name | Level | Health | AI Type | Abilities | Elemental Stats | Drops | Location |
|---|---|---|---|---|---|---|---|---|
|
Grootslang Wyrmling (Phase 1) |
75 | 180000 | ??? | Charge Multihit |
✹ Weak ✽✤✦ Def |
- | Nest of the Grootslangs |
|
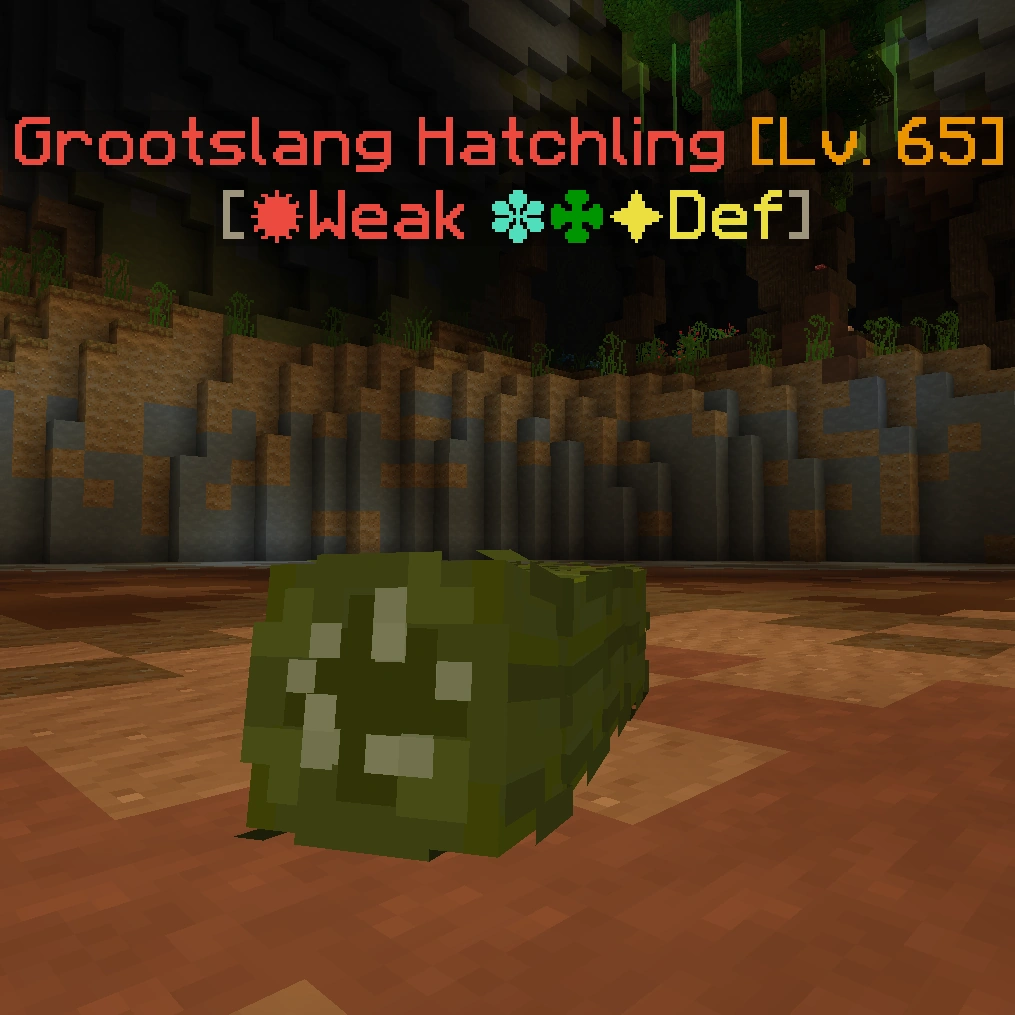
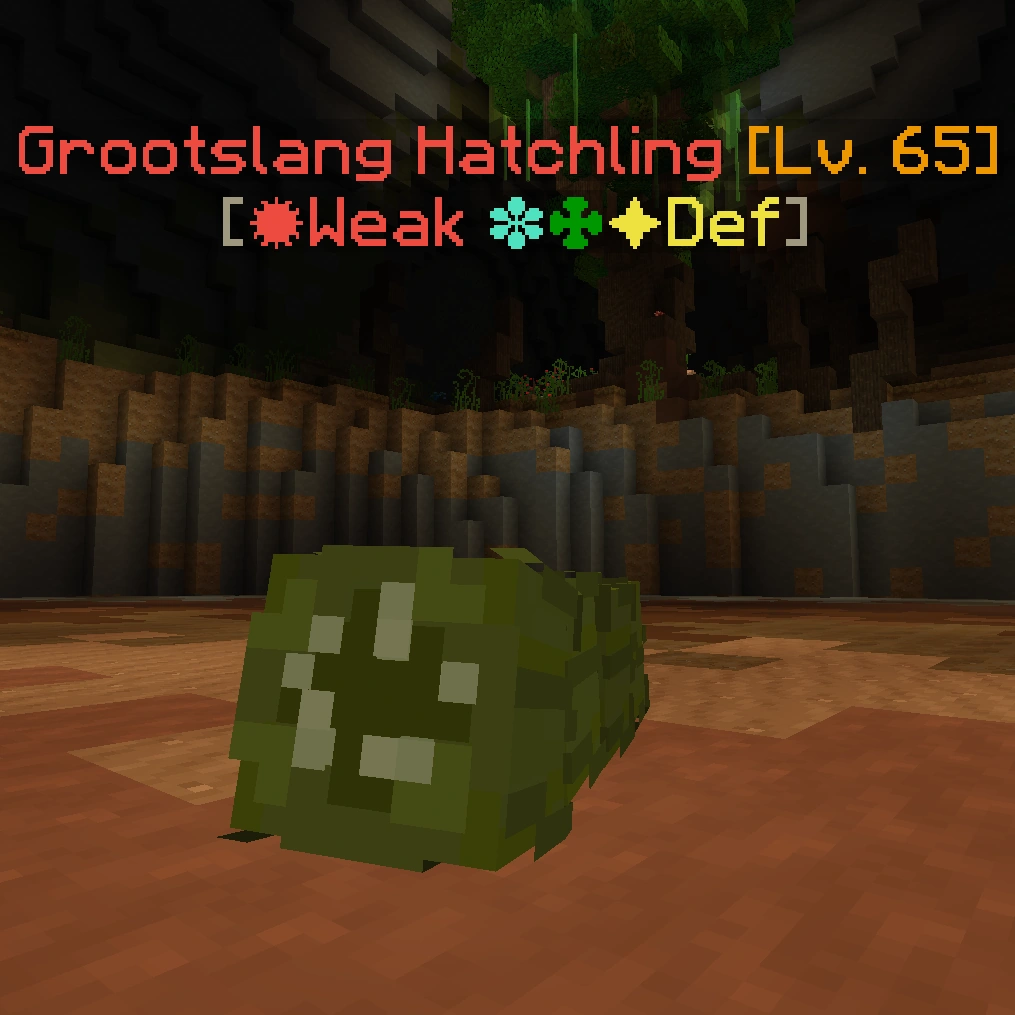
Grootslang Hatchling (Phase 1) |
65 | 37500 | Melee AI | - | ✹ Weak ✽✤✦ Def |
- | Nest of the Grootslangs |
Phase 2
| Image | Name | Level | Health | AI Type | Abilities | Elemental Stats | Drops | Location |
|---|---|---|---|---|---|---|---|---|
|
Grootslang Wyrmling (Phase 2) |
85 | 185500 | ??? | Charge Multihit |
✹ Weak ✤ Dam ✽✤✦ Def |
- | Nest of the Grootslangs |
|
Grootslang Hatchling (Phase 2) |
65 | 37500 | Melee AI | - | ✹ Weak ✽✤✦ Def |
- | Nest of the Grootslangs |
Phase 3
| Image | Name | Level | Health | AI Type | Abilities | Elemental Stats | Drops | Location |
|---|---|---|---|---|---|---|---|---|
|
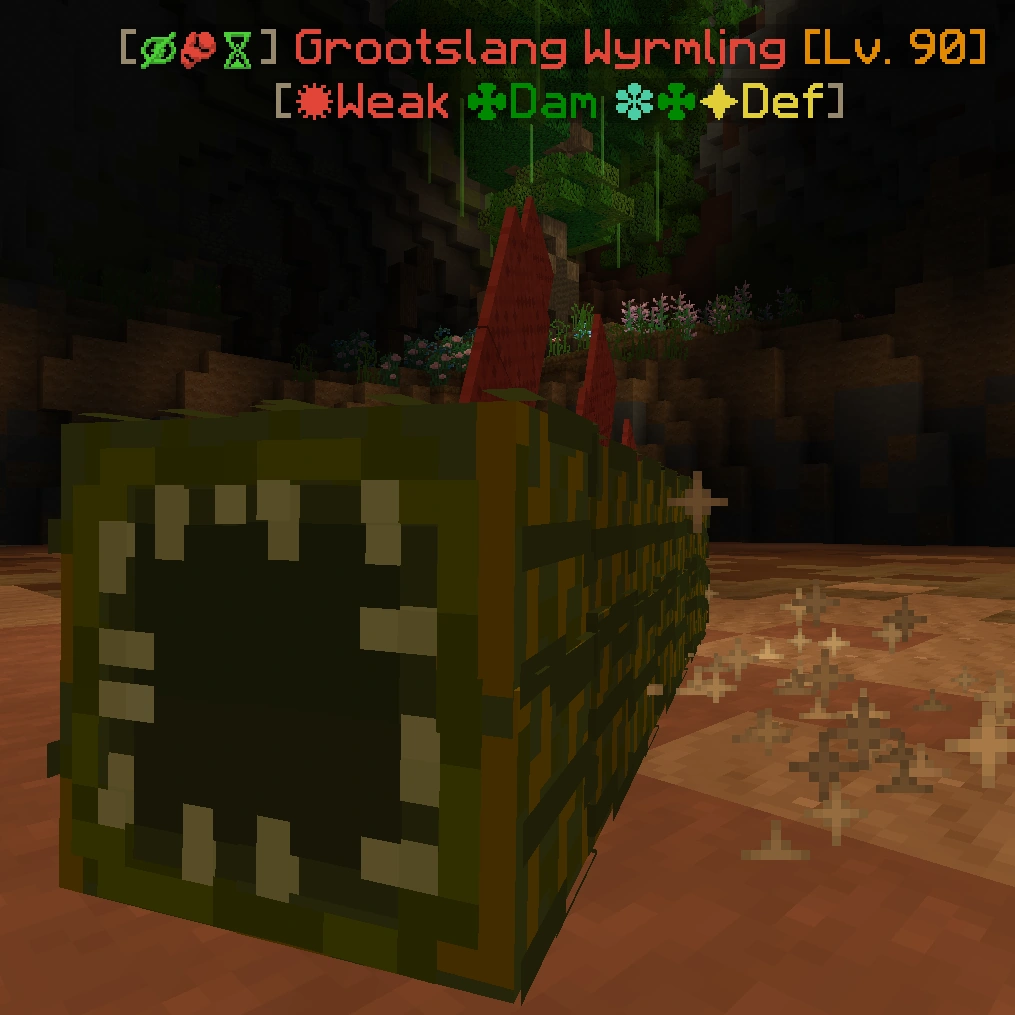
Grootslang Wyrmling (Phase 3) |
90 | 245000 | ??? | Charge Multihit |
✹ Weak ✤ Dam ✽✤✦ Def |
- | Nest of the Grootslangs |
|
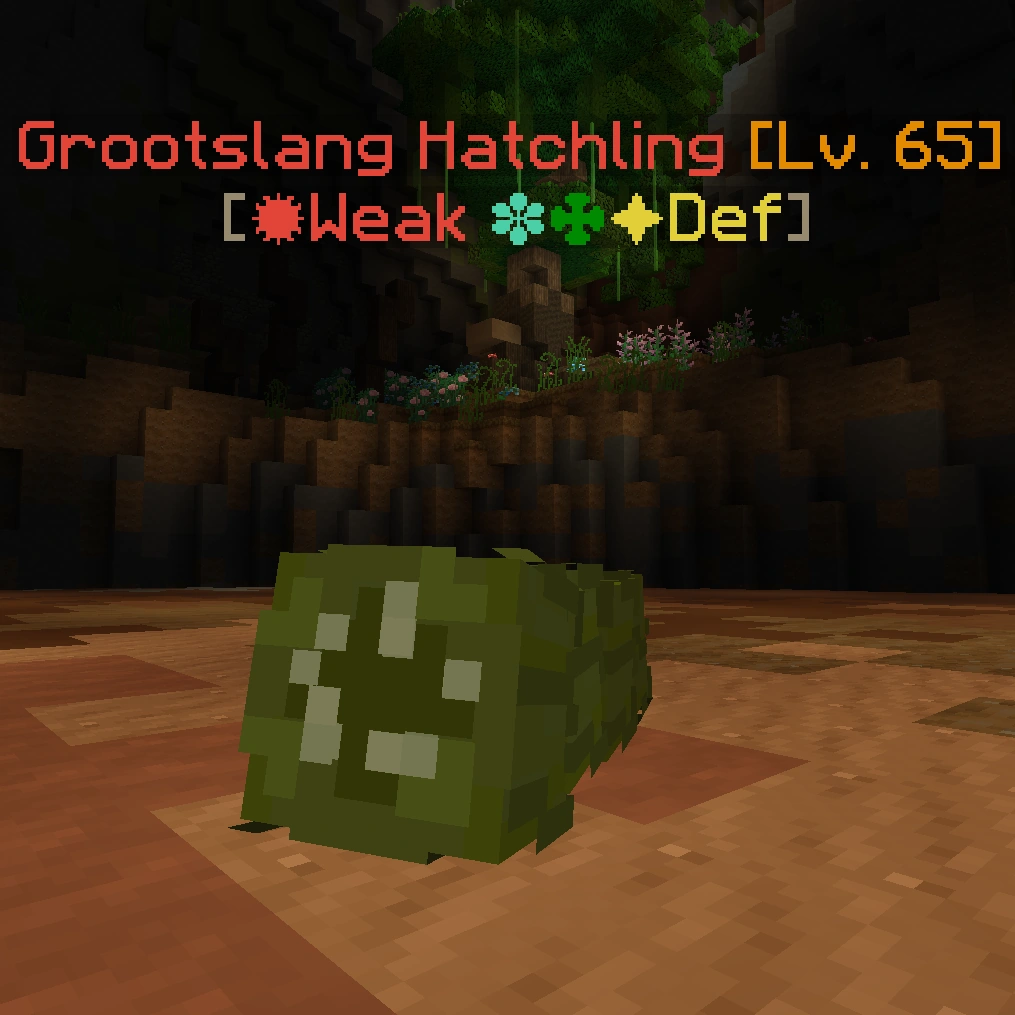
Grootslang Hatchling (Phase 3) |
65 | 37500 | Melee AI | - | ✹ Weak ✽✤✦ Def |
- | Nest of the Grootslangs |
Phase 4
| Image | Name | Level | Health | AI Type | Abilities | Elemental Stats | Drops | Location |
|---|---|---|---|---|---|---|---|---|
|
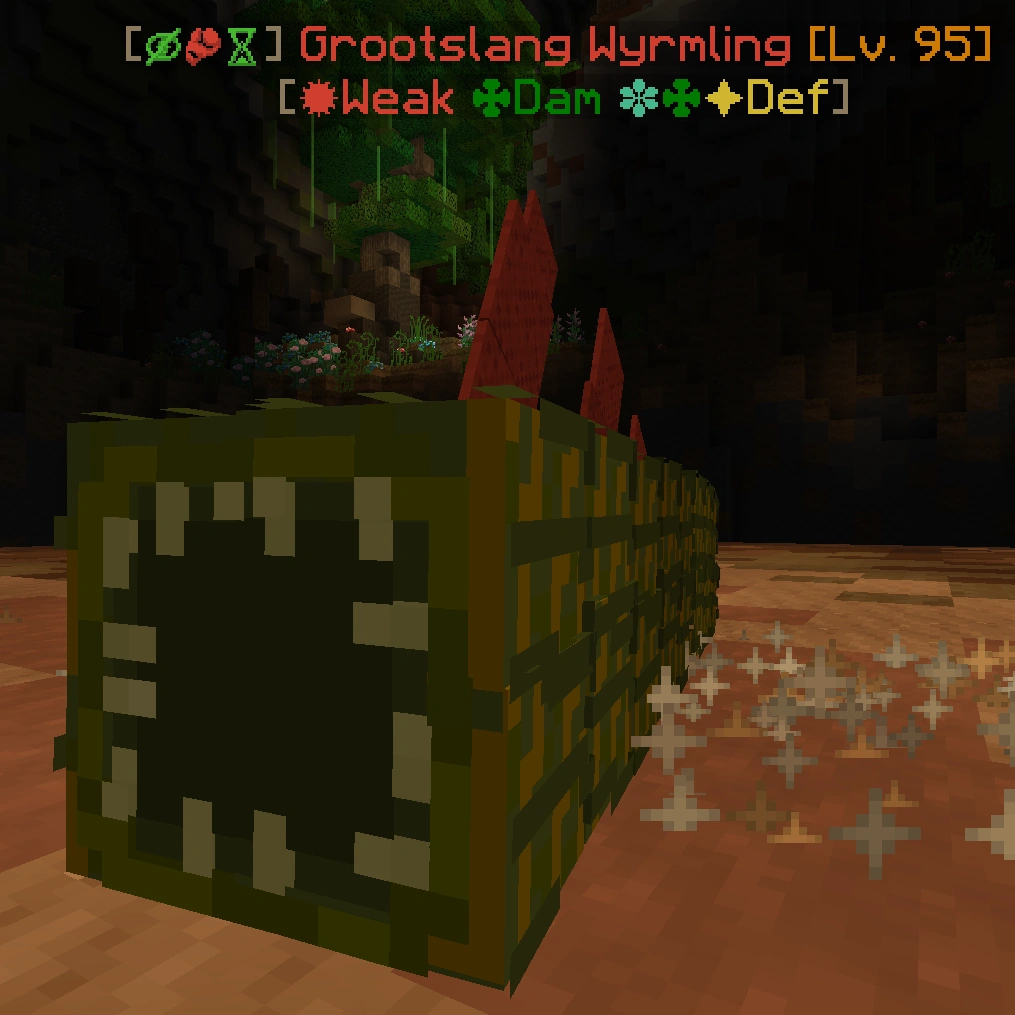
Grootslang Wyrmling (Phase 4) |
95 | 305500 | ??? | Charge Multihit |
✹ Weak ✤ Dam ✽✤✦ Def |
- | Nest of the Grootslangs |
|
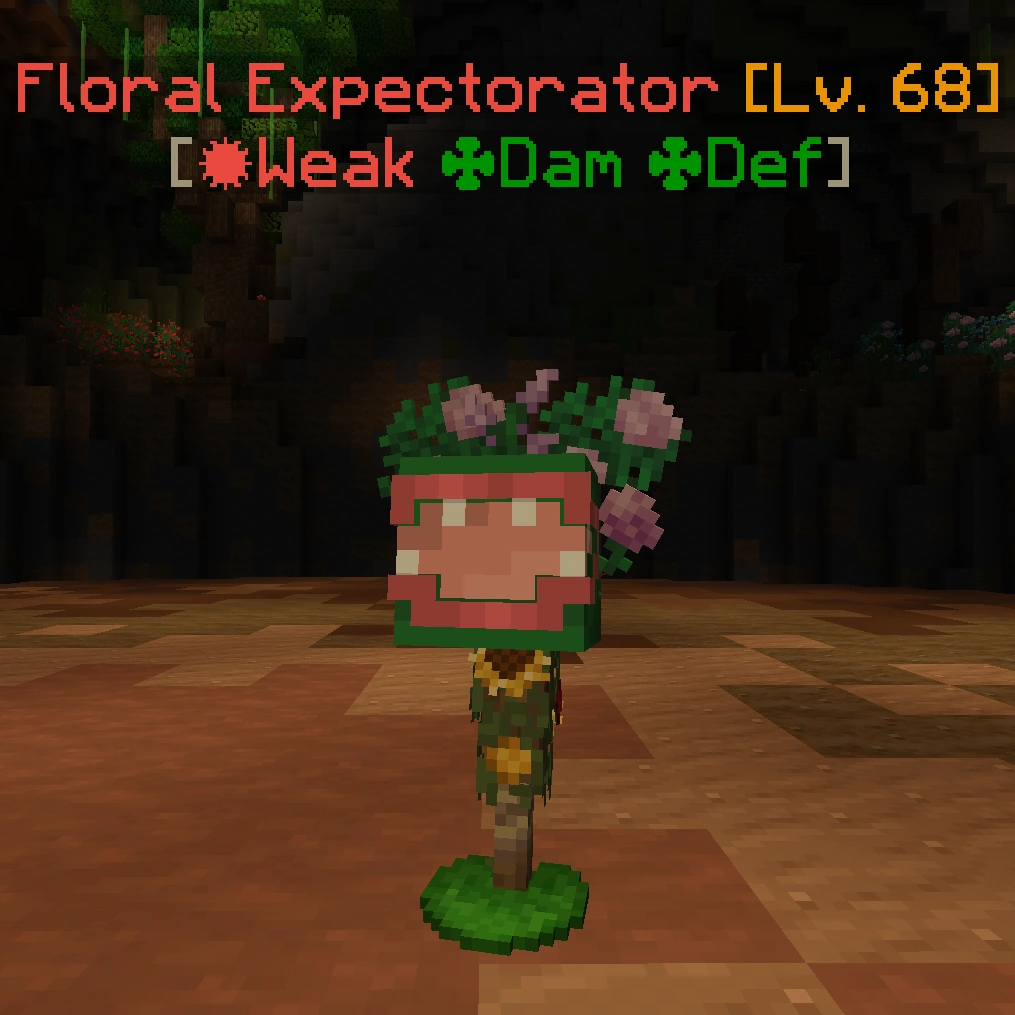
Floral Expectorator (Phase 4) |
68 | 44500 | RapidRanged AI | Arrow Storm | ✹ Weak ✤ Dam ✤ Def |
- | Nest of the Grootslangs |

|
Grootslang Hatchling (Phase 4) |
65 | 37500 | Melee AI | - | ✹ Weak ✽✤✦ Def |
- | Nest of the Grootslangs |
Phase 5
| Image | Name | Level | Health | AI Type | Abilities | Elemental Stats | Drops | Location |
|---|---|---|---|---|---|---|---|---|
|
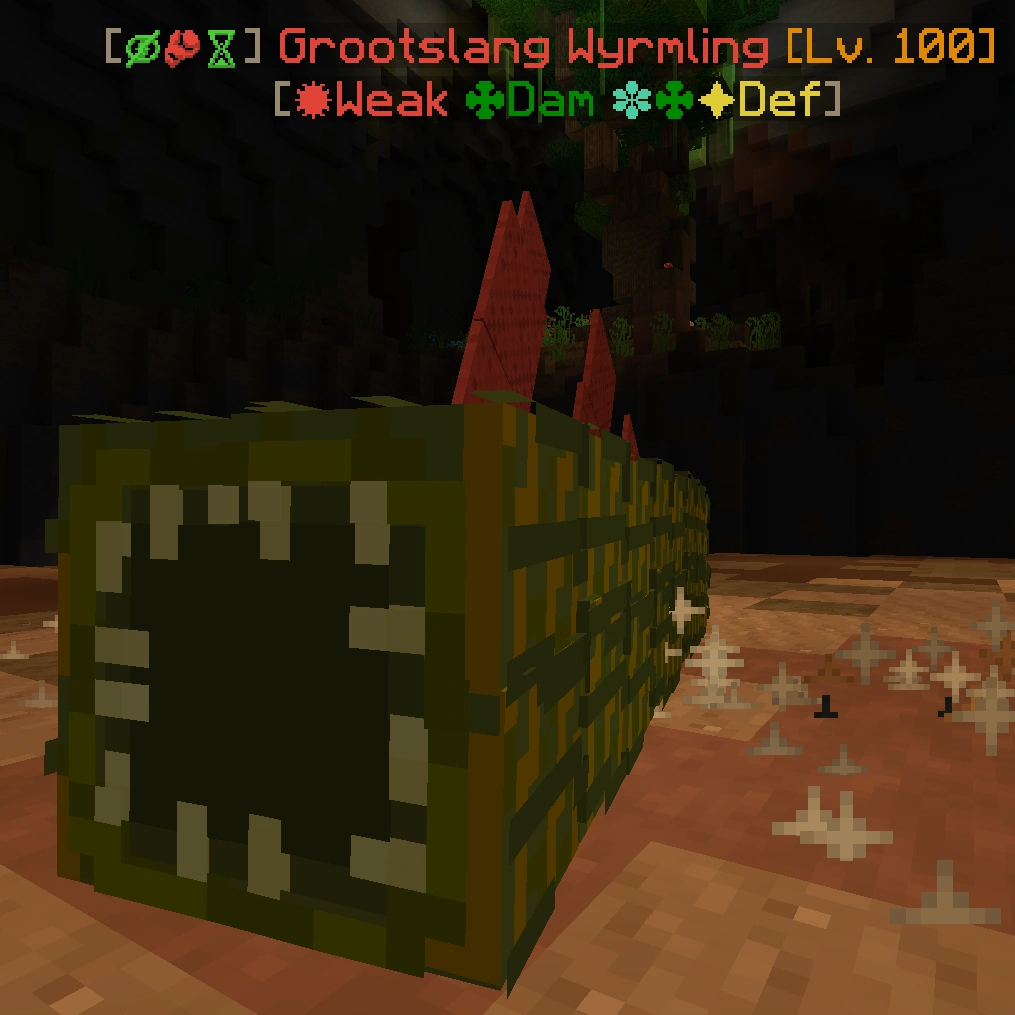
Grootslang Wyrmling (Phase 5) |
100 | 230000 | ??? | Charge Multihit |
✹ Weak ✤ Dam ✽✤✦ Def |
- | Nest of the Grootslangs |

|
Floral Expectorator (Phase 5) |
68 | 44500 | RapidRanged AI | Arrow Storm | ✹ Weak ✤ Dam ✤ Def |
- | Nest of the Grootslangs |
Trivia
- The entrance to the raid had existed since Gavel release, but it had no use until Version 1.20. It was generally thought to be a Naga temple due to an Olux Citizen hinting towards it in their dialogue.
- This is also the introductory raid, it's been confirmed that there'll be no more lower levelled raids in the future.