This article is about the Raid. For the Guardian of the Canyon of the Lost, see The Colossus.
| The Canyon Colossus | |
| |
| Discovery Lore | |
|---|---|
| A sight to behold, this enormous statue has resided in the Canyon of the Lost for as long as history can tell. Its magic permeates throughout the entire canyon, making it nigh-impossible to navigate. | |
| Access | |
| Coordinates | X: 662, Z: -4448 |
| Minimum Level | 95 |
| Suggested Level | 100+ |
| Max Party Level | 500 |
| Quest Required | None |
| Runes Required | 4 Tol Runes |
| Players Required | 4 |
| Raid | |
| Monsters | Damaged Colossus Spawn Amythest-Shelled Snail Derelict Stone Golem Adakite Beast Stone Construct Prehistoric Soarer Runaway Fleris Stalactite Cluster Canyon Soarer Mercury Puddle Malfunctioning Golem Fossilized Harpy Fissuring Sediment Gargoyle Incorporated Human Colossal Jam Electrified Fragment Animated Fragment Unstable Plasma Pesky Periodotite Examiner Igneous Neuron |
| Boss | The Colossus Colossal Duke Colossal Eye Mammoth Mouth Quartzite Cerebellum Gnarled Mouth Ruptured Ear |
| Rewards | ? |
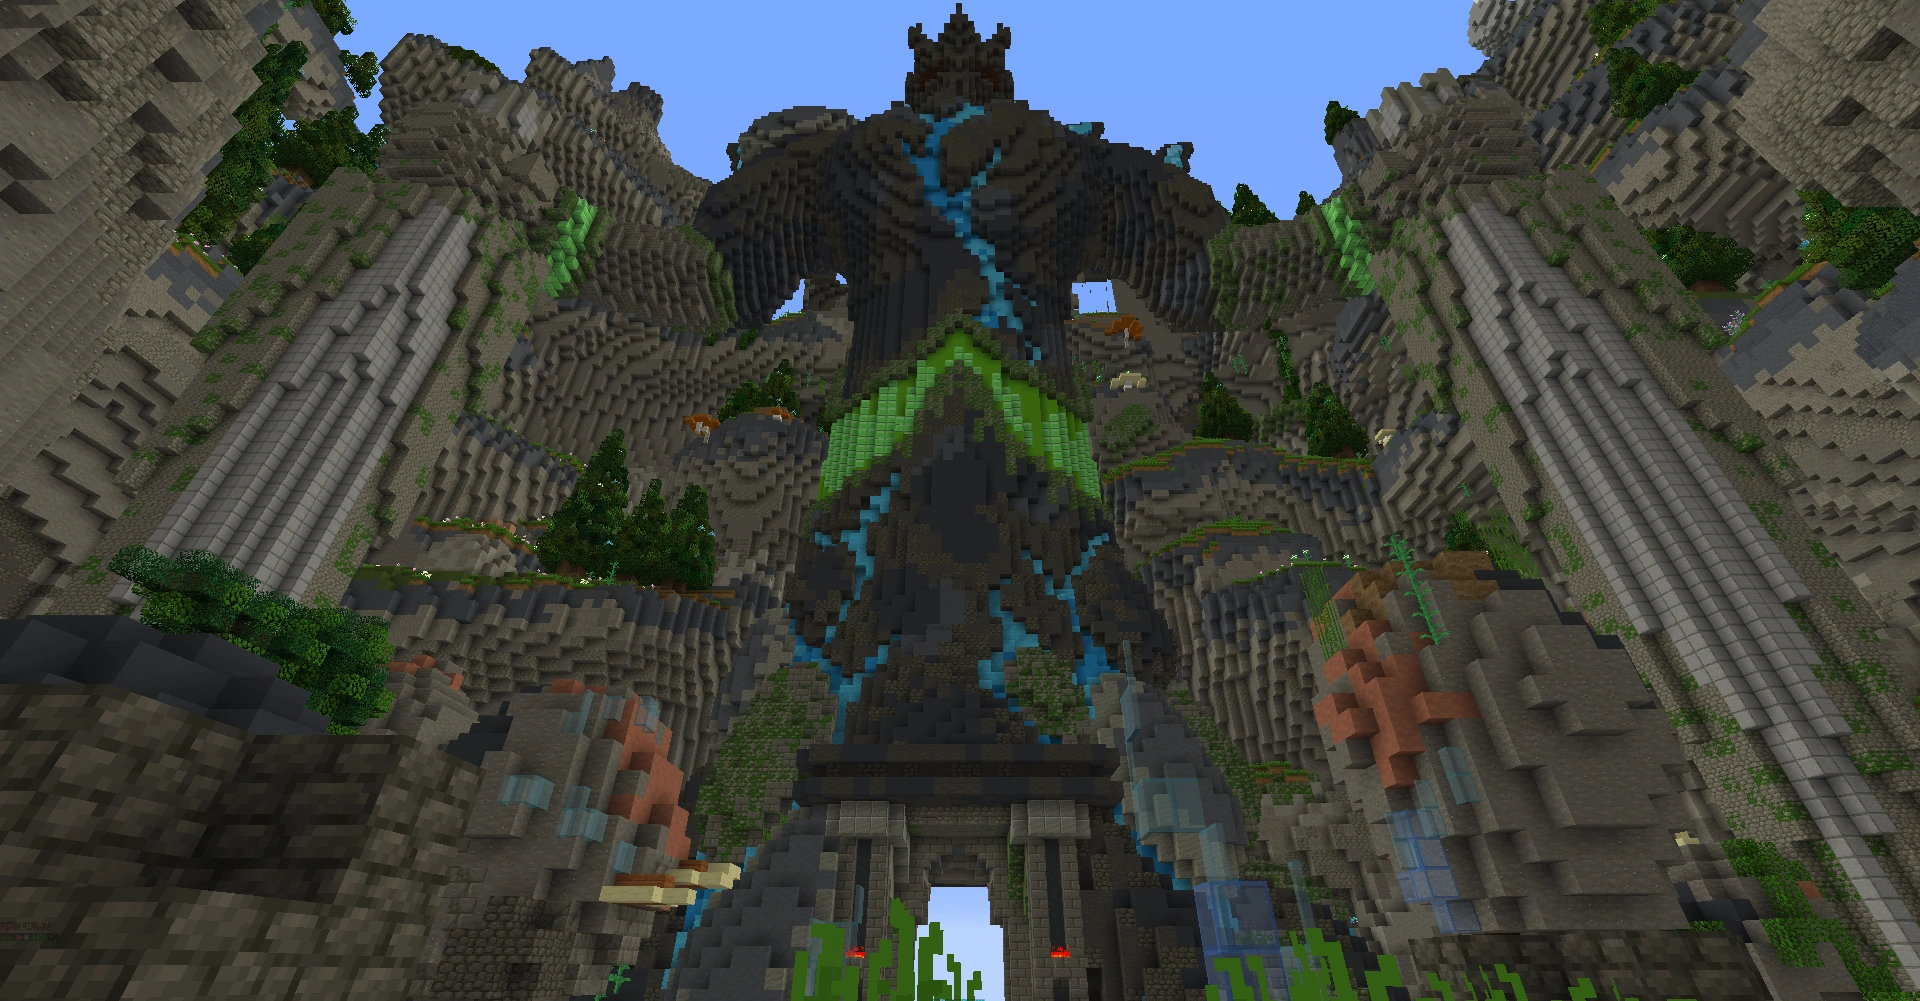
The Canyon Colossus, subtitled "When the earth begins to shatter...", is the last and currently highest-level Raid in Wynncraft. It was added to the game in the 1.20 Gavel Reborn update, alongside the two other Raids in Gavel Province, the Nest of the Grootslangs and Orphion's Nexus of Light.
Like other Raids, The Canyon Colossus is a team-based challenge, requiring a party of 4 players to complete. As it is designed for endgame players level 100+, the total combat level of all party members is capped at 500, although since the maximum level a player can reach is 106, and there can only be 4 players, it technically has no level limit.
Preparing for the Raid
| Location | Canyon of the Lost | X | 662 | Z | -4448 | Wynncraft Map |
To take on The Canyon Colossus, you must first assemble a party of 4 players. Each must be at least level 95.
The entrance to the Raid is inside the body of the Colossus on the southeastern edge of the Canyon of the Lost. The nearest town is Kandon-Beda, not too far away, and can be accessed through the Colossal Passage as a form of quick-travel, which you can use to restock on Runes before or in between runs, as well as Potions, crafted consumables or other supplies, which can prove invaluable.
Once your party is prepared, travel to the entrance, and the party leader will have to hand 4 Tol Runes to the Raid Keeper. Tol Runes can be obtained through converting Nii Runes or Uth Runes at a Tol Altar. Once the Runes have been given, your party will enter The Canyon Colossus and be faced with your first Challenge Room.
Challenge Rooms
Progressing through The Canyon Colossus involves defeating three randomly-selected Challenge Rooms in succession. Each of these rooms involves a variety of cooperative challenges, including puzzles, parkour, and combat, that your party must work together to complete. If you die during a challenge, you will be able to spectate the rest of your party while they continue. When a challenge is completed, all dead players are revived; if too many players die at once, however, and you are consequently unable to complete the challenge, you will fail the Raid and be brought back to the entrance.
After each Challenge Room, you will enter a rest area where you can regroup, access a Blacksmith and choose Power-Ups before tackling the next challenge; see the Power Ups section for details.
Room 1
Minigame Room
The Minigame Room has Damaged Colossus Spawns in the main area of the room, and rocks that block the entrance to the separate passageways. Completing a challenge gives you 1 Iron Bar, and you and your team must gather 10 to progress. There are 5 different minigames in total:
Boulders
In this room, you avoid Amethyst-Shelled Snails and boulders heading your way. If you get hit by a boulder, you go back to the beginning of the room.
Block Colors
In this room, you must survive by standing on the correct color of blocks to avoid falling into the void below. Falling in will add 5 seconds to the timer and bring you back to the start. Survive for the total amount of time to get the Iron Bars.
Parkour
In this room, you will have to complete a parkour to get the Iron Bars. The darker platforms will disappear after a certain amount of time, and the brighter platforms will move horizontally.
Mini-Boss
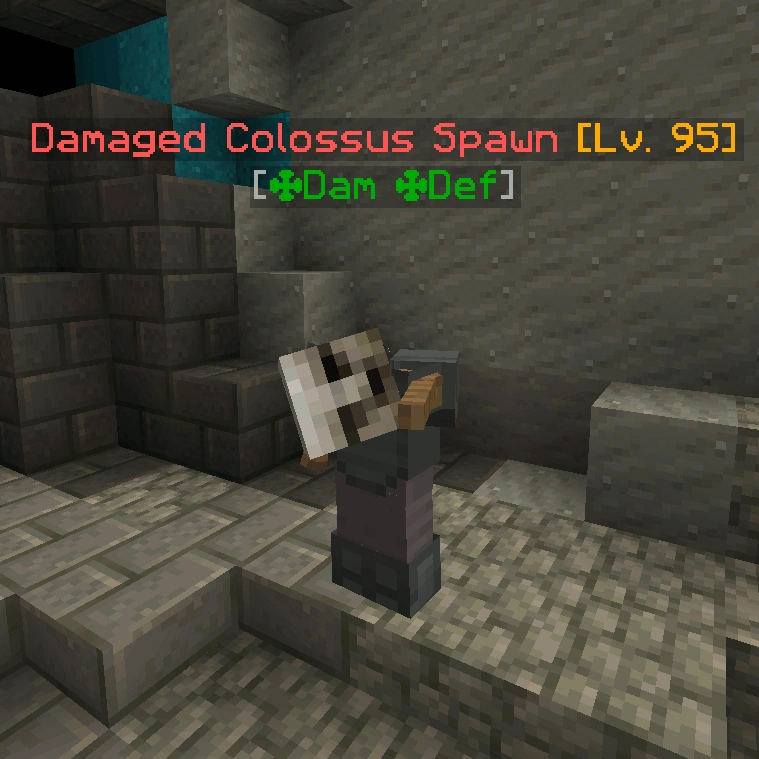
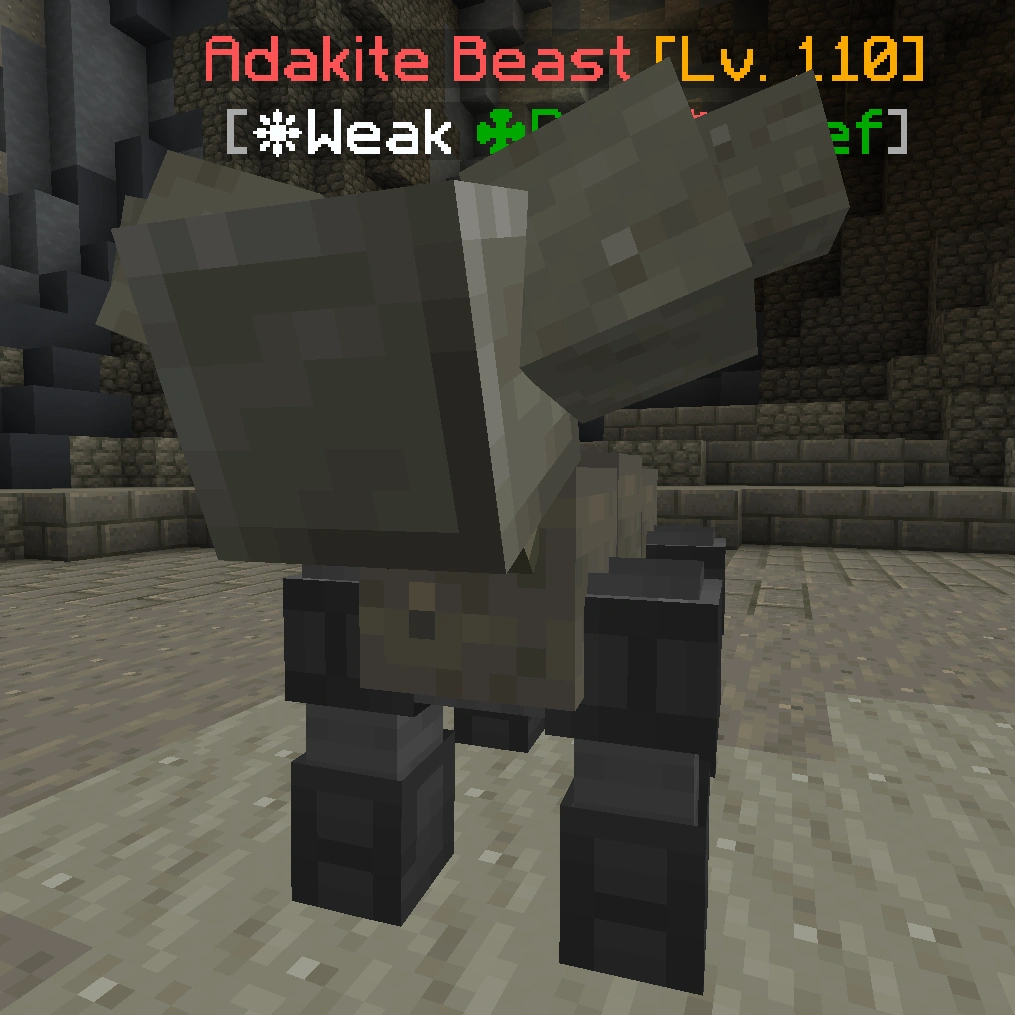
In this room, you have to defeat a miniboss, it will either be the Derelict Stone Golem or the Adakite Beast. Kill the miniboss to get the Iron Bars.
| Image | Name | Level | Health | AI Type | Abilities | Elemental Stats | Drops | Location |
|---|---|---|---|---|---|---|---|---|
|
Damaged Colossus Spawn | 100 | 70000 | Melee | Charge | ✤ Earth: Damage, Defense | - | The Canyon Colossus (Minigame Room) |
|
Adakite Beast | 110 | 200000 | Ranged | Charge Arrow Storm |
❋ Air: Weakness ✤ Earth: Damage, Defense ✹ Fire: Defense |
Iron Bars | The Canyon Colossus (Miniboss 1 Room) |
| File:DerelictStoneGolem.png | Derelict Stone Golem | 110 | 200000 | Melee | Charge Pull |
❋ Air: Weakness ✤ Earth: Damage, Defense ✹ Fire: Defense |
Iron Bars | The Canyon Colossus (Miniboss 2 Room) |
| File:Amethyst-ShelledSnail.png | Amethyst-Shelled Snail | 100 | ? | Melee | - | ❋ Air: Weakness ✤ Earth: Damage |
- | The Canyon Colossus (Boulder Room) |
Lava Lake Room
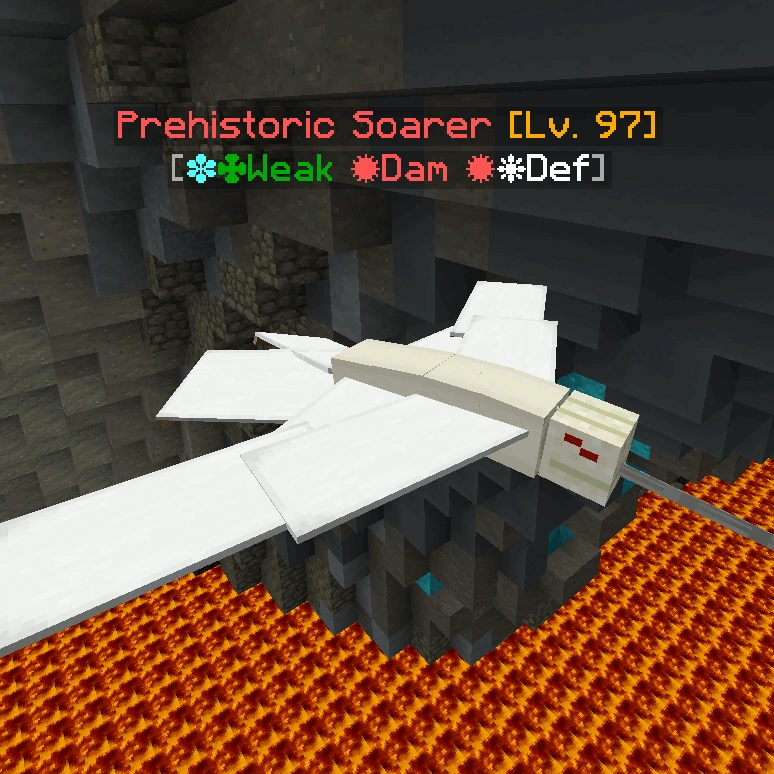
In this room, you and your teammates must extinguish lava falls that are flaming. There will be a pond where you can get Water Buckets from that can be used to extinguish the active lava falls. Once 5 have been put out, have a teammate stand on the newly created platform. It is recommended the tankiest teammate goes on there since there will be Prehistoric Soarer mobs that deal considerable amounts of damage. Repeat the process 2 more times, with your teammate going on the next platform, and then the room will be completed. If you fail to extinguish a lava fall 4 times, then the progress towards the next platform will be reset, and the platforms will be reset if the teammate goes off the platform.
| Image | Name | Level | Health | AI Type | Abilities | Elemental Stats | Drops | Location |
|---|---|---|---|---|---|---|---|---|
| File:StoneConstruct(Level108).png | Stone Construct | 108 | 200000 | Melee | Charge Heavy Explosion |
❋ Air: Weakness ✤ Earth: Damage, Defense |
- | The Canyon Colossus (Lava Lake Room) |
|
Prehistoric Soarer | 103 | 100000 | Ranged | Flamethrower | ❋ Air: Defense ✤ Earth: Damage, Defense |
- | The Canyon Colossus (Lava Lake Room) |
.png)
Room 2
3 Platforms
You and your teammates will be put in a room with blocked off passageways. Runaway Flerisi and other creatures will plague the area. After a while, passageways will open, and at least 3 players must be in a separate area of the room. If your team fails to do this, everyone will be sent back to the center. In every section there is a platform for a teammate to stand on, and when 3 of your teammates stand on there, a timer will appear, and will tick down as long as 3 people are on the same platform. After a while, the passageways will open up again to the center. Repeat until the timer runs out of time to progress to the next room.
| Image | Name | Level | Health | AI Type | Abilities | Elemental Stats | Drops | Location |
|---|---|---|---|---|---|---|---|---|
| File:Runaway Fleris.png | Runaway Fleris | 99 | 80000 | Melee | Charge Flamethrower |
✽ Water: Weakness ✹ Fire: Damage, Defense |
- | Canyon Colossus |
| File:Stalactite Cluster.png | Stalactite Cluster | 104 | 100000 | Melee | Arrow Storm | ✤ Earth: Damage, Defense | - | Canyon Colossus |
Labyrinth
There will be powerful mobs at the center of the maze, and there will be wings in the center. One player must take the wings to fly around the area, and telling the teammates where to go. There will be walls in the middle of the maze, and right-clicking them will summon a Malfunctioning Golem miniboss that must be killed to take down the wall. Every player must stand on the white circle to complete the room.
| Image | Name | Level | Health | AI Type | Abilities | Elemental Stats | Drops | Location |
|---|---|---|---|---|---|---|---|---|
| File:StoneConstruct(Level102).png | Stone Construct | 102 | 200000 | Melee | Charge Heavy Explosion |
❋ Air: Weakness ✤ Earth: Damage, Defense |
- | Canyon Colossus |
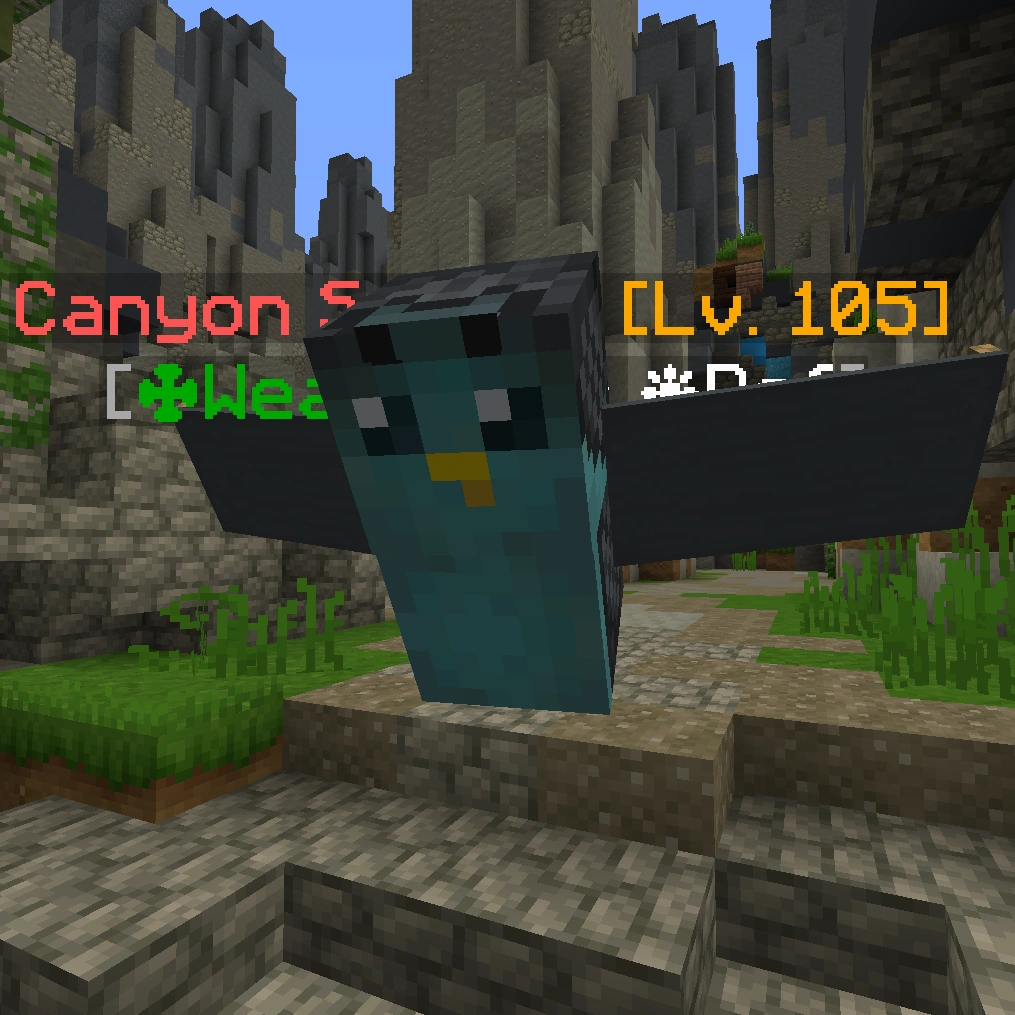
|
Canyon Soarer | 105 | 100000 | Ranged | Arrow Storm | ❋ Air: Damage, Defense ✤ Earth: Weakness |
- | Canyon Colossus |
| File:MalfunctioningGolem.png | Malfunctioning Golem | 115 | 300000 | Melee | Flamethrower Charge |
❋ Air: Weakness ✤ Earth: Damage, Defense ✦ Thunder: Defense |
- | Canyon Colossus |
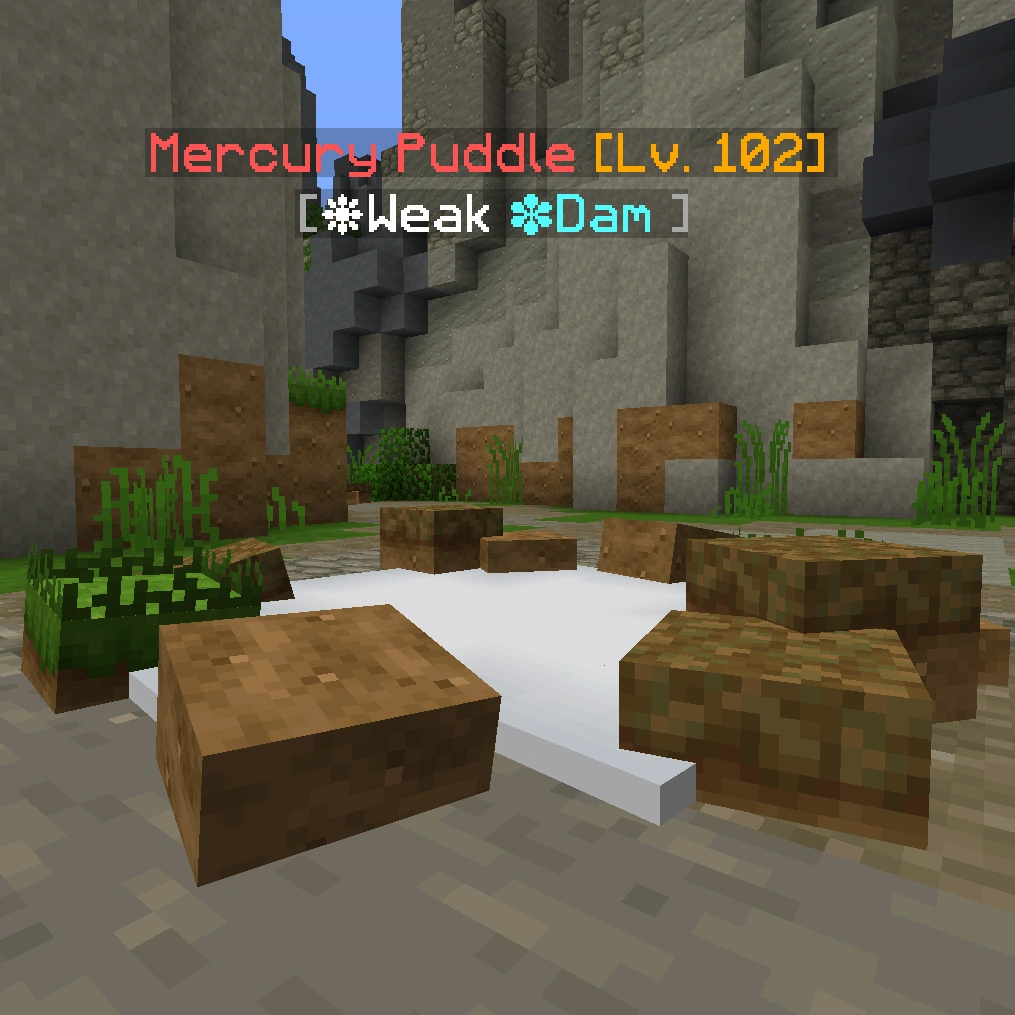
|
Mercury Puddle | 102 | 80000 | Melee | Multihit | ❋ Air: Weakness ✽ Water: Damage |
- | Canyon Colossus |
.png)
Room 3
2 Platforms
In the room, there will be 2 platforms, an upper and lower one. Have a tanky player stand on the upper platform to open the door to the lower one, and have the player stand on the lower platform to open the door to the exit. Both platforms must be stood on for 60 seconds, but be careful, when the platform starts to smoke, its a warning sign that spikes will soon appear on the platform. If you stand on the platform when the spikes emerge, you will be heavily knocked back.
| Image | Name | Level | Health | AI Type | Abilities | Elemental Stats | Drops | Location |
|---|---|---|---|---|---|---|---|---|
| File:Fossilized Harpy.png | Fossilized Harpy | 100 | 100000 | Ranged | Arrow Storm | ❋ Air: Damage, Defense ✤ Earth: Damage, Defense |
- | Canyon Colossus |
| File:Fissuring Sediment.png | Fissuring Sediment | 101 | 250000 | Melee | Self Destruct Push |
✽ Water: Damage, Defense ✤ Earth: Damage, Defense |
- | Canyon Colossus |
| File:Amethyst-Shelled Snail.png | Amethyst-Shelled Snail | 100 | 150000 | Melee | Multihit | ❋ Air: Weakness ✤ Earth: Damage |
- | Canyon Colossus |
4 Golems
In this room, you must protect 4 Golems (North, East, South, West) from the Incorporated Human mobs. There will be tanky Gargoyle mobs that also hit hard, but the Incorporated Humans are the main mobs to focus on. Each Golem has 5 HP, and when an Incorporated Human gets to the Golem, it will deplete its health by 1 HP. The Incorporated Humans, however, are very low in HP and do not attack players, making them much easier to deal with compared to the Gargoyles.
| Image | Name | Level | Health | AI Type | Abilities | Elemental Stats | Drops | Location |
|---|---|---|---|---|---|---|---|---|
| File:Gargoyle Colossus.png | Gargoyle | 105 | 300000 | Melee | Charge Multihit |
✤ Earth: Damage, Defense | - | Canyon Colossus |
| File:Prehistoric Soarer.png | Prehistoric Soarer | 103 | 100000 | Ranged | Multihit Teleport |
❋ Air: Defense ✤ Earth: Damage, Defense ✹ Fire: Weakness |
- | Canyon Colossus |
| File:Incorporated Human.png | Incorporated Human | 105 | 1000 | - | - | ❋ Air: Weakness ✤ Earth: Damage, Defense ✽ Water: Weakness |
- | Canyon Colossus |
Power Ups
After each of the three Challenge Rooms, you will be able to choose one of three randomly-selected powerups, increasing in tier from I to III with each successive challenge. Note that each set of powerups to choose from is independently randomized, so being offered a specific Tier II powerup in the second room will not necessarily mean that the corresponding Tier III will be available in the next room.
For further information on the Major IDs provided in some of these powerups, see the Identifications page. Inside the Raid, you can right-click each powerup to see a description of their effects.
| Powerup | Tier I Effects | Tier II Effects | Tier III Effects |
|---|---|---|---|
| Monk | +70 Agility +40 Intelligence +100% Reflection |
+4 Mana Regen +60 Intelligence +100% Water Damage |
+7 Mana Regen +100% Spell Damage +100% Water Damage |
| Stonewalker | +60 Defense +100% Thorns +3500 Main Attack Damage |
+60 Strength +35% Exploding +200% Main Attack Damage |
+4500 Main Attack Damage +300% Main Attack Damage +Explosive Impact Major ID |
| Giant | +3000 Health Bonus +50 Defense |
+5000 Health Bonus +400 Health Regen Raw |
+7000 Health Bonus +1000 Raw Health Regen +50% Health Regen |
| Intrepid | +40 Dexterity +80% Walk Speed +Guardian Major ID |
+75% Spell Damage +2 Attack Speed Tiers Savior's Sacrifice Major ID |
+50 Agility +80 Dexterity +Heart of the Pack Major ID |
| Pestilent | +5000/3s Poison +50 Strength +750 Life Steal |
+7500/3s Poison +5 Mana Steal +100 Strength |
+10000/3s Poison +1250 Lifesteal +Plague Major ID |
The Boss Fight
The Colossus, subtitled, The Broken Protector, is the boss of The Canyon Colossus Raid. It has 3 phases, and you will have to defeat many parts of it to beat the raid. If you fall off the platforms, you will take 25% of your Current HP as damage.
Phase 1, The Defense System
The Colossus's first phase also known as the Defense System, first phase has his hands, Colossal Dukes, defend the head from attacks, also known as the Defense System. The Colossal Dukes have 2 Million HP each, and will attack from a range. It has Multihit, Push, Explode, and Arrow Storm, and will also summon its minions like Colossal Jams, Electrified Fragments, Animated Fragments, and Unstable Plasma. When the Colossal Dukes are defeated, Phase 2 will begin, with it saying the Defense System has failed.
| Image | Name | Level | Health | AI Type | Abilities | Elemental Stats | Drops | Location |
|---|---|---|---|---|---|---|---|---|
| File:Colossal Duke.png | Colossal Duke | 189 | 2000000 | Ranged | Arrow Storm | ❋ Air: Weakness ✤ Earth: Damage, Defense ✹ Fire:Defense |
- | Canyon Colossus |
| File:Electrified Fragment.png | Electrified Fragment | 150 | 40000 | Melee | - | ? | - | Canyon Colossus |
| File:Unstable Plasma.png | Unstable Plasma | 150 | 40000 | Melee | - | ? | - | Canyon Colossus |
| File:Animated Fragment.png | Animated Fragment | 150 | 40000 | Melee | - | ? | - | Canyon Colossus |
Phase 2, The Colossal Head
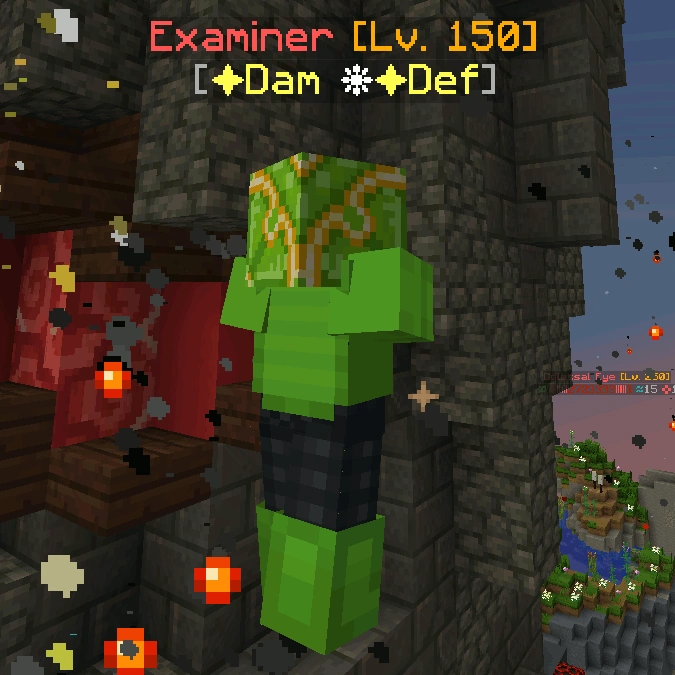
The second phase of the Boss Fight will pit you against the head of the Colossus. The main enemies of this phase are the Colossal Eyes and the Mammoth Mouth. The Eyes have an Arrow Storm ability, but the main feature of then is that it can summon Examiner minions which have a strong Pull spell. However, the top threat is the Mammoth Mouth. It can summon Pesky Peridotites, which are tanky and have a strong Explosion spell, but the Mouth can also destroy a platform of the arena. If you get on a red platform, after a while, it will take away 50% of your current HP. It can also destroy a platform, which takes off an even greater amount of HP off of you.
After a while, a Colossal Core mob will appear. It has 500 Thousand HP, and must be killed or else it will erupt, which deals massive damage to anyone in the vicinity. The player who was closest to the Colossal Core when it was destroyed will be 'chosen' by the core, allowing that player to finish the fight for the team. It will appear a second time after a while, and when the Colossal Eyes and Mammoth Mouth have been defeated, the players will see a cinematic of the Colossus's head coming off of the body, and Phase 3 will begin as a result.
| Image | Name | Level | Health | AI Type | Abilities | Elemental Stats | Drops | Location |
|---|---|---|---|---|---|---|---|---|
| File:Mammoth Mouth.png | Mammoth Mouth | 250 | 4000000 | Stationary | Flamethrower Field explosion |
✽ Water: Weakness ✤ Earth: Weakness ✹ Fire: Damage, Defense |
- | Canyon Colossus |
| File:Colossal Eye.png | Colossal Eye | 250 | 3000000 | Stationary | Arrow Storm | ✽ Water: Defense ✤ Earth: Defense ✦ Thunder: Weakness |
- | Canyon Colossus |
| File:Pesky Peridodite.png | Pesky Peridotite | 140 | ? | Melee | Multihit Explosion |
? | - | Canyon Colossus |
|
Examiner | 150 | ? | Melee | Pull | ? | - | Canyon Colossus |
| File:Colossal Core.png | Colossal Core | 300 | 500000 | - | - | Erupt | - | Canyon Colossus |
Phase 3, Damaged Colossal Head
The Colossus's head is all that is left to defeat of the Broken Protector, and it has 2 Neutral Ruptured Ear mobs, and a neutral Quartzite Cerebellum and Gnarled Mouth as well, all of which have 1,000,000 HP. The Quartzite Cerebellum will summon Igneous Neuron mobs, and they all fire projectiles rapidly. Additionally they have revenge mechanism: it will fire as many times as you hit it. So casting arrow storm and multihit can be quite dangerous. Also, the Gnarled Mouth has a Flamethrower spell, and the 2 Ears have an Explode spell. Once all of the main parts of the Damaged Head have been defeated, the chosen players have 20 seconds to enter the body of the Colossus.
Once a chosen player is inside, a timer will start ticking down from 40 seconds. The Puzzle inside the body is very simple, you just have to look at the floor and copy the pattern onto the green 3*3 grid at the back of the room. If a square has a red X on it, then you need to press the button to register the tile. If the team does not get into the Colossus in time or if they take too much time in the puzzle, the raid will be failed. Once the puzzle has been solved, the Raid is completed.
| Image | Name | Level | Health | AI Type | Abilities | Elemental Stats | Drops | Location |
|---|---|---|---|---|---|---|---|---|
| File:Quartzrite Cerebellum.png | Quartzrite Cerebellum | 400 | 1000000 | Ranged | ? | ✽ Water: Weakness ✤ Earth: Weakness ✹ Fire: Weakness ✦ Thunder: Defense ❋ Air: Defense |
- | Canyon Colossus |
| File:Ruptured Ear.png | Ruptured Ear | 400 | 1000000 | Ranged | Explosion | ✤ Earth: Defense ✽ Water: Weakness ✹ Fire: Weakness ❋ Air: Weakness ✦ Thunder: Weakness |
- | Canyon Colossus |
| File:Gnarled Mouth.png | Gnarled Mouth | 140 | 1000000 | Ranged | Flamethrower | ✹ Fire: Defense ✽ Water: Weakness ✤ Earth: Weakness ❋ Air: Weakness ✦ Thunder: Weakness |
- | Canyon Colossus |
| File:Igneous Neuron.png | Igneous Neuron | 150 | ? | Ranged | - | ? | - | Canyon Colossus |
Raid Rewards
When you complete the raid, a chest will appear in the reward room. Open it to claim the reward. Raid rewards may include raid exclusive rewards, such as Mastery Tomes and Corkian Amplifiers. It also has chance to include several emerald blocks, raid-exclusive fabled items, and horses.
Tips and Tricks
As earth themed raid, most mobs in the raid does earth damage. So having earth defense can help a little bit.
Only the chosen ones can enter colossus and complete the final puzzle. If all chosen ones die, it becomes impossible to complete the raid. So if you're chosen, take extra care to stay alive.